for example I already have a database with the name is "AdressBook" and a table with the name is "Persons".
The table of Persons has values below :

Open Your Visual Studio application and create a visual C# project, then select Windows Form Apllication, fill your name project with "SimpleDBAps", and choose directory that you'll use for saving your project. if you doing it right, you'll see like below :

You have a form with the name is "Form1". because of this forms is our main form, let's rename "Form1" to "MainForm". You can rename it on Solution Explorer, right click and select rename. it's will appear a dialog windows, select Ok to agree.
furthermore, we'll add a DataGridView on our MainForm. DataGridView is a toolbox that will show your table values. Select the Toolbox tab to show all the list of toolbox component. Search the DataGridView, if you already fine it, then double click to add it to MainForm, so that its result like below.

Click on DataGridView area to ensure this toolbox is active, and then rename the DataGridView's name to "myDataGridView". You can rename it on Properties list.

View MainForm script
Click on MainForm area to ensure it's active, then press F7 to show MainForm.cs (coding mode). You will see some lines of code like below :
using System;
using System.Collections.Generic;
using System.ComponentModel;
using System.Data;
using System.Drawing;
using System.Linq;
using System.Text;
using System.Threading.Tasks;
using System.Windows.Forms;

namespace SimpleDBAps
{
    public partial class MainForm : Form
    {
        public MainForm()
        {
            InitializeComponent();
        }
    }
}
The code above only will appear a blank windows form. Let's add litle code to make our apps more useful :using System;
using System.Collections.Generic;
using System.ComponentModel;
using System.Data;
using System.Drawing;
using System.Linq;
using System.Text;
using System.Threading.Tasks;
using System.Windows.Forms;
using System.Data.SqlClient; //Namespace for sqlconnection
namespace SimpleDBAps
{
public partial class MainForm : Form
{
SqlConnection conn;
string strConn;
public MainForm()
{
InitializeComponent();
//Make object for connection
strConn = @"Server = .\SQLEXPRESS;" + "Database = AdressBook; Integrated Security = true";
conn = new SqlConnection(strConn);
//showing all Persons's table values to myDataGridView
SqlCommand command = new SqlCommand("Select * from Persons", conn);
//Opening connection to database
conn.Open();
//Stored SqlDataReader return value from commnad.ExecuteReader() to object reader
SqlDataReader reader = command.ExecuteReader();
//Loading reader object to myTable object
DataTable myTable = new DataTable();
myTable.Load(reader);
//closing connection to database
conn.Close();
//make data source for myDataGridView from myTableObject
myDataGridView.DataSource = myTable;
}
}
}
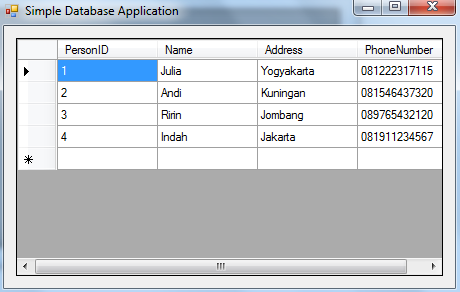
Press Ctrl + F5 to run program. so that its result like below :

Seems there has been forgotten. We haven't changed MainForm Text property as can be seen the windows form title text is Form1.
to change the windows form title name, click on MainForm area to activate it, and go to property list and search Text property, change Form1 to "Simple Database Application". So that the final result will be like below :
No comments:
Post a Comment